Arc Welder Setup Instructions
Arc welder setup varies with each brand of welder, but there are some essentials. Setting the right amperage for the rod size is one of them.
1) Set up the equipment in a safe place & organize items that you're using.
2) Secure the pieces you'll be welding, and connect the ground clamp to one of them.
3) Turn on the welder and set the amperage to just past the half-way point of the suggested range listed on the machine.
4) With the rod holder well away from the work pieces, insert the rod & "lock" it into one of the grooves (usually the angled one).
5) Place the rod tip a couple inches away from where you're going to weld.
6) Lower your helmet and you're ready to strike the arc.
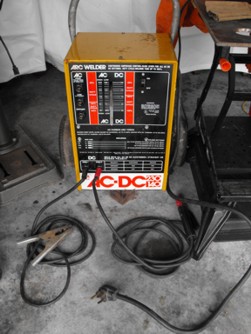
Have a close look at the picture below:

This is my 220 Volt AC/DC arc welder, set for DC reverse. Arc welding with DC reverse runs smoother than AC, and I've used both. But the DC type welder costs more & I wasn't in a position to spend more at first.
The power connector is a special kind. You will need to buy the right receptacle for it. But if you bought a simple "buzz box" you can just plug it into a regular outlet.
You will eventually find a good setting. Remember though, if you weld in a different position, you'll likely need to change the welder setup again.
Every situation will differ, but there are the same essentials:
Essentials include: what you're wearing, how you've set the machine, what position you're welding in, if you've taken safety precautions, & have some way of securing the work-pieces, as needed.
Go to "The Arc and the Puddle" PAGE
Back to arc welding MAIN PAGE HOME Arc Welder Setup top of page
Want MORE INFO about "arc welder setup"? Get it from my ebook, "The Arc And Beyond":
Click HERE to see ebook INFO